
queen box north - now has a laying queen - i found brood open and capped
took 2 queen cells from my queen builder
put one in queen box south (queenless)
put another one in a nuc box with a frame of nurse bees/honey and a frame of pollen
Monday, June 17, 2013
Thursday, June 13, 2013

Monday, June 10, 2013
queens
rosier hive - queen hatched - other queen cells ripped open
no longer queenless!
My queen rearing box is queenless on both sides. I took some eggs from (rosier split) hive the other day and put them in my queen box - 3 queen cells growing now. :)
no longer queenless!
My queen rearing box is queenless on both sides. I took some eggs from (rosier split) hive the other day and put them in my queen box - 3 queen cells growing now. :)
Saturday, June 8, 2013
Ephraim cutout (14 feet up)
Got a call a couple weeks ago from an apartment manager in Ephraim. He had a colony of bees in an apartment that he wanted removed.
We talked about it for a bit and decided we'd give it a try.
They were entering the building between the bricks at the end of a rain gutter above the third floor. We first checked the wells and ceiling inside the apartment (was vacant) but found no bees. We started poking holes in the wall of the entry stair and finally found them in the ceiling. We had 2 12 foot ladders but were not comfortable doing a cutout standing on the top of a ladder. The apartment manager rounded up some scaffolding for us. This positioned us about 6 feet beneath the hive and put them in easy reach.
We set up a bee vacuum on the roof to catch any field bees returning to the colony.
This worked great. The only thing I'd change is to set this up earlier. Maybe let it go all day (time permitting)
Video of bee vac in action.
I don't know why but it's funny to me to watch the bees get sucked right out of the air.


Things I'd do different:
1 - start earlier (we didn't actually start the removal until about 8:30 pm (finished at 2)
2 - cover the ground better (faster clean up)
3 - make sure we have everything we need (including water) right where we are so we don't have to wander in and out tracking sticky mess
4 - take a cookie pan to place the comb on instead of trying to hand hold it or carrie it on a bucket lid. The cookie sheet will contain the mess better, plus we will be less likely to break the comb if it's fully supported.
5 - I need a better veil - mine isn't really suited for working above my head
6 - have all the empty frames prepared beforehand for tying the comb in. This includes already having the twine precut and attached. (or wires if we are going that route).
7 - Maybe 3rd vac for mess clean up. Can't clean up the mess with a vacuum already full of bees.
8 - Setup our comb tie in area closer to the actual cutout. less mess walking around with comb.
9 - Extra power cords
10 - learn how to use the bee vac to get the girls from between the combs. If we could remove ALL bees before attempting to cut comb, it would be a lot less messy. As it is, we can remove the bees from the side of the comb we can see, cut the comb, then hold the comb (dripping) while we remove the bees from the other side. Messy
11 head lamp mounted over my veil
We talked about it for a bit and decided we'd give it a try.
They were entering the building between the bricks at the end of a rain gutter above the third floor. We first checked the wells and ceiling inside the apartment (was vacant) but found no bees. We started poking holes in the wall of the entry stair and finally found them in the ceiling. We had 2 12 foot ladders but were not comfortable doing a cutout standing on the top of a ladder. The apartment manager rounded up some scaffolding for us. This positioned us about 6 feet beneath the hive and put them in easy reach.
We set up a bee vacuum on the roof to catch any field bees returning to the colony.
This worked great. The only thing I'd change is to set this up earlier. Maybe let it go all day (time permitting)
Video of bee vac in action.
I don't know why but it's funny to me to watch the bees get sucked right out of the air.


exploratory holes

Found 'em!


scaffolding setup


Mess

job done
Things we did right:
1 - The double bee vac system was awesome. We didn't end up with 30,000 bees on the outside when we were done.
1 - start earlier (we didn't actually start the removal until about 8:30 pm (finished at 2)
2 - cover the ground better (faster clean up)
3 - make sure we have everything we need (including water) right where we are so we don't have to wander in and out tracking sticky mess
4 - take a cookie pan to place the comb on instead of trying to hand hold it or carrie it on a bucket lid. The cookie sheet will contain the mess better, plus we will be less likely to break the comb if it's fully supported.
5 - I need a better veil - mine isn't really suited for working above my head
6 - have all the empty frames prepared beforehand for tying the comb in. This includes already having the twine precut and attached. (or wires if we are going that route).
7 - Maybe 3rd vac for mess clean up. Can't clean up the mess with a vacuum already full of bees.
8 - Setup our comb tie in area closer to the actual cutout. less mess walking around with comb.
9 - Extra power cords
10 - learn how to use the bee vac to get the girls from between the combs. If we could remove ALL bees before attempting to cut comb, it would be a lot less messy. As it is, we can remove the bees from the side of the comb we can see, cut the comb, then hold the comb (dripping) while we remove the bees from the other side. Messy
11 head lamp mounted over my veil
Wednesday, June 5, 2013
updates
Checked a few hives last night.
Apricot swarm/sun barrel - building nicely (and straight) I had removed the stabilizers because they were a bit narrow. I made them wider and put them back on. I'll have to be careful when opening this one, If the burr-comb to the lild, when I open the lid it lifts the frames.


Apricot swarm/sun barrel - building nicely (and straight) I had removed the stabilizers because they were a bit narrow. I made them wider and put them back on. I'll have to be careful when opening this one, If the burr-comb to the lild, when I open the lid it lifts the frames.


wax scales dropped on the bottom of the hive

Very happy with this one.
Lilac swarm (deer repelant). this swarm is also building nicely. lots of eggs. very calm bees.
Rosier split. This is the box that had the queen. She is laying nice and they are building new comb. Lots of bees. This is how a split should be. I also cut out a bit of comb with eggs in it to put in my queen box. I cut out about a 4 x 1 inch chunk and just attached it as one piece to the queen box.
Tree Cutout - I was worried this one was queenless. But I found her last night and she's even started laying eggs. :)
House Cutout - these girls are ornery! Jerry speculated that perhaps they're ornery because I tied their comb in 90 degrees out from the way they had built it in the house. They don't know which way is up. Possible. Huge colony. Tons of brood. Tons. Building lots of comb too. Almost filled 5 mediums now.
Monday, June 3, 2013
Cut Down Split progress
It's been 2 weeks since I split the Patterson hive and a week since I split the Rosier hive.
I checked both this afternoon. Both had queen cells. Pattersons had 3 (that I could see - tricky to see sometimes). Rosiers had 6. Very encouraging. Meanwhile they are packing in the honey. :-)
I checked both this afternoon. Both had queen cells. Pattersons had 3 (that I could see - tricky to see sometimes). Rosiers had 6. Very encouraging. Meanwhile they are packing in the honey. :-)
Friday, May 31, 2013
Bad News, Good News, and Really Good News!
Bad News:
I had Jerry (from Moab) come by to inspect my hives and take bee samples for a USDA survey he's working on. The first hive we decided to work was my queen box in the back yard.
We went through the entire hive, both colonies and didn't see any open brood or eggs. There were a few capped drone cells and a few capped worker cells but that's it. I had split these hives 18 days ago (story here). We did here piping on the north end and we found opened queen cells on both ends. I'll wait a week and check again before I really worry.
Good News:
I had Jerry look through my dying rustic hive and he agreed with me that there are no signs of a brood disease. It's so helpful to have experienced eyes looking at the comb with me. He pointed out "entombed pollen" on some of the comb. I'd seen it before but did not know what it was called or what it was. The girls decide for some reason that the pollen in that cell is no good and they wax it over. Interesting to me that they wouldn't just remove it. They must know what they are doing.
Really Good News:
I was showing off my Sun Barrel Hive to Jerry and we determined that they are building some very nice, very white, very straight comb. Right where I wanted them too. I removed the comb stabilizers from the bars in the hive. they are a bit small (just a touch) and they were pulling the tops of the bars together. I'll adjust them and put them back on or maybe I won't worry about it. They seem to be fine without the stabilizers. We also noticed what looked like a pile of salt on the hive floor under the cluster. When we picked some up it was wax flakes. They must have been producing so much wax that they dropped some. The comb they had built was also packed with honey. I did not see any eggs but I didn't remove any bees to really look either. Once I do, I'll remove the queen "includer". I'm very happy about how this hive is working out.

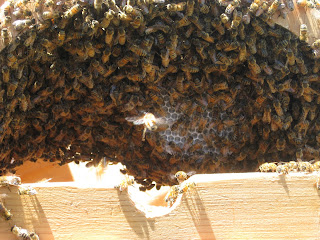
view from below

with stabilizers on

from above (showing comb)

from the front (showing comb)


Subscribe to:
Posts (Atom)